Helping you to satisfy your taste for crafts on a budget.
"Whatever your hand finds to do, do it with all your might," Ecclesiastes 9:10
Powered by Blogger.

Friday, December 21, 2012

The gift of baked goods

Baked goods, (or "gifts in a jar") are an inexpensive easy gift to give to those special people in your life for Christmas; teachers, bus drivers, neighbors...


Laila's teacher has mentioned that she loves banana bread, so I decided to make Cinnamon Swirl Banana Muffins for her and her assistant (the recipe is for bread, but I used the same method to make muffins).
And Emma came home from school one day and told us that her teacher had all her students try egg nog. So I am hoping that she likes our gift because I found a delicious recipe for Crumb Topped Cranberry Eggnog Muffins. {Click on the recipe names for links to the recipes.}


To package them, I bought cheap but festive $1 snowman paper plates, muffin liners, and picks at Dollar Tree. I hole punched around the edge of the plates, and laced ribbon through and tied at the top.


Then I used Press N Seal to cover and tied yarn/twine over the top.
I tied 3 paper tags to each plate; a Merry Christmas stamp, the name of the muffin, and each girl wrote her name on one.


Emma's note for her bus driver: she even drew a little bus! :)


So proud of Laila for being able to write her own name (see it there on the circle punch?)
Which is just one reason why her teachers deserve a treat!


Be sure to thank your teachers!!!


Thursday, December 20, 2012

Stocking Stuffers

It is snowing! We are only getting an inch or two, but it is blustery cold out and blowing snow, which really makes it finally feel like Christmas! And with Christmas only 5 DAYS away, I believe we are ready! I saved my stocking stuffer shopping for my last shopping event. I went to Walmart and grabbed everyones favorites.


Yes, we LOVE chocolate! Chocolate kisses, milky ways (Emma's fave), Hersheys (Laila's fave), chocolate Santas, Kit Kats.
 
Play doh for both girls
 
Poster crayons for Emma, glitter crayons for Laila
 
Goldfish for Laila, mini nutella for Emma
 
Gum and gourmet nuts for Daddy
 
Coffee for Mommy
 
John and I both grew up with an orange in our stocking on Christmas morning,
so of course we carry on the tradition, but with cuties.
 
And of course, baby carrots for Santas reindeer.
It even says right on the bag "Official Snack of Santa!"
:)
 
 
Once I load up on stocking stuffers, I'm never sure if everything is going to fit. For some reason, I always worry that I won't have enough to fill them, but every year I end up with too much. So when I got home, I got the stockings out and test-filled them to make sure.

Does anyone else's cats seem to always get comfortable on whatever it seems you are trying to work on? It doesn't matter what it is; pile of laundry, pile of coupons, pile of Christmas stockings...


Yep, there he is. Glaring at me thinking "oh, you didn't need these stockings did you? But they're so warm and comfy!" Silly cat!

Are you ready for Santa?

Wednesday, December 19, 2012

Yarn wrapped trees


Here is a very simple Christmas decor idea for ya.
Have you walked through Target's Christmas decor section lately? There are so many different kinds of super cute mini trees that are not cheap.  But there are lots of ideas on pinterest on how to make your own using materials at home.

I really wanted to make these twine trees:


but it takes a special kind of glue that is not available in a 30min radius of me, so I will wait and make those next year. For now, I resorted to yarn wrapped trees. This version I made is not the sturdiest, but it works for me.

I started with a paper plate base. This idea I found at Ashley Kaitlin here is the link to show you how to make them. I made a white one and a twine wrapped one.


I decided that poster board would make a sturdier base and make for a taller tree. I had black posterboard in the office, leftover from one of Emma's school projects. I rolled up a corner and used hot glue to hold it in the cone shape.


It just takes a little cutting and trimming to get the bottom flat, here is a look from the bottom (sorry for the horrible picture quality):


Then wrapped it in soft white yarn, starting from the bottom and working my way up:


Here it is finished:


I did happen to have a styrofoam cone base that I wrapped in red yarn. I honestly think the paper plate and posterboard ones worked just as well as the styrofoam cone one.


Then once I had them sitting together, something was missing. They just didn't look right. They definitely needed something to sit on, which I guess is why all the diy trees you see on pinterest are sitting on different candlesticks in varying heights.

See the difference?


 Final setting:


What do you think? Do they need some sort of topper?

If you really like this idea of making your own decorative trees, I highly suggest you check out The Creativity Exchange blog. There are tons of ideas and even patterns and tutorials you can purchase for making your own fabric covered trees! Really really pretty stuff! I think I might go a little fancier next year now that I've tried a few!


Sunday, December 16, 2012

Girl Scouts December meeting

At last month's girl scout meeting, I made a mental note that we need to dive into the girl scout law and the character virtues behind it. So this month we did that. We opened with the Girl Scout promise. Then we talked about the Girl Scout Law and what each part means. I asked them to share examples of when they used those characteristics, or noticed someone else using them (or NOT using them!). They even took it a step further and started acting out examples!

So we covered:
helpful,
friendly,
considerate,
caring,
honest,
fair, etc.

For our activity, we made coffee filter snowflakes. Just like each of the girls, each snowflake is different. They colored with markers and cut out all different shapes and designs. Each girl made 2-3 snowflakes.


We took the snowflakes to a local nursing home where we went caroling this weekend. The residents were thrilled to see children visit and sing to them! And now their doors are a little more festive too!


I was really happy that everyone was able to make it to this meeting! We even had another "visitor brownie"who might be joining soon! In the wake of the Newtown, CT school shooting, I look at every child different now. Every little life is so precious and should be cherished and lived to the fullest. I just read that 8 of the 12 girls who lost their lives were Daisy Scouts. I am so thankful for each and every one of these girls!

We are looking forward to more songs, games, crafts, activities, and outings in 2013. And of course COOKIE SALES start in January!! So if you know a girl scout, be ready to place your order!

Sunday, December 9, 2012

A few of my favorite things

Raindrops on roses and whiskers on kittens...I've loved that song since I was little, and just the phrase "my favorite things" makes the song pop into my head...along with visions of Julie Andrews dancing around with the kids in The Sound of Music.

Well, here are a few of my favorite things this time of year...

Baking! Here is my Christmas cookie jar that my mom gave me.


Filled with our favorite...Chocolate Chip Cookies!


A baking themed plate from Hallmark.


It reads:
 
 
"In this family

we do sprinkles

we do sharing

we do double batches

we do (real) butter

we do flour fights...{ok not really, but I didn't make the plate}

we do holidays

we do Love."


My favorite coffee mug that I bought with the plate at Hallmark.


Vintage Christmas tree candy dish that once belonged to my grandmother.


Christmas stories
We are big on reading around here so here is a collection of our favorite Christmas/winter books


Christmas movies...our family favorites...The Polar Express and Christmas Vacation!


Christmas tunes...our favorites are:
Emma...Silent Night
Me...O Holy Night
John...Carol of the Bells
All of us...Christmas/Sarajevo 12/24 by Transiberian Orchestra
 

I love this season!!
Take time to enjoy your favorite things!!


Thursday, December 6, 2012

Little boy's appliquéd onesies

Since I have little girls, as much fun as they are to shop for, I do enjoy looking for things for my nephews. Every little boy needs an outfit to wear to church, weddings, or any dress up occasion. So when I saw these appliqué onesies, I had to try to duplicate them for my youngest nephews. I have 5, but these were specially made for the 2 youngest, who are still in onesies. :)


And check out the very youngest at his latest outing...isn't he the cutest?!


These were so easy to make.

You need onesies, fabric, and heat n bond.
This is the fabric I picked out from Walmart:


  • 3 pack of onesies...$7 (I also bought matching pants so they would have something to go with their onesies)
  • I bought 1/2 yard fabric of the gray fabric, and 1/4 yard of the other 3 (for the ties this is the least amount you can get away with)
  • The total cost of the fabrics was less than $5, and I estimate I could probably make several more tie appliqués from the amount I have left.


For the tie appliqué, I used the pattern and tutorial from Char at Crap I've Made.


For the vest, I used the idea from Lemon tree creations. But instead of free-handing the vest pattern, I borrowed the Paper Dolls cricut cartridge from a friend and used my cricut to "sort-of" cut the pattern. I haven't used the cricut a lot, but for some reason the 2 halves of the vest were not equal so it was not a mirrored image and it just didn't look right since it needed to be centered over the tie. So I had to do a little extra cutting to get it to fit right, but it was not difficult.


Basically, the steps are:

Print, trace, and cut out your pattern onto card stock.
Fuse your heat n bond to the WRONG side of your fabric
(the side you DON'T want showing)
Trace your pattern onto the heat n bond paper
Cut out your fabric/heatnbond applique
Peel off heat n bond backing
Fuse fabric onto onesie
You can even stitch around your appliqué if you want a more finished look. I tried it on the first couple I did, but decided that although it looks nice, its not necessary, and they are just as cute without.


These are Christmas gifts for the boys, but I'm pretty sure the little guys won't be reading this blog anytime soon, so I figured it was ok to go ahead and post early. :)

Hope they like these!

Sunday, December 2, 2012

Christmas Decor

December is here and the halls are decked! I keep things somewhat simple but I do enjoy the lights, the tree, the music, the nativity, etc. here is a glimpse into our home, ready for Christmas.


The tree
We have a prelit artificial tree. We adorn it with sentimental ornaments. We started with the ones that John and I grew up with. Now we add to them every year with ornaments that the kids have collected. John's mom has gotten them one every year. Then of course there are the ones that they bring home from school, you know, the macaroni and glitter kind. Hey! That would have been a great blog name! Macaroni and Glitter!


Here is Emma's little corner of the tree where she clustered all her ornaments together.

I'm so glad I bought this Hallmark Countdown Ornament last year. We love it! It tells us precisely how many days, hours, minutes, and seconds until Christmas Day!


The tree skirt
John's mom gave us this special gift as soon as our family started growing. She had it embroidered with our names, and every year she takes the girls' handprints and stitches the outline onto the skirt so that we can show them how much they've grown!

Laila:
Emma:


Nativity Scene
Ok, we haven't graduated to a grown up nativity scene yet. Ha! Here is our Fisher Price Little People Nativity Setting that we still play with. I don't have a good explanation for why Joseph is at the top of the manger instead of the angel. I just left it the way the kids had it last time they played with it. I also just realized that a littlest pet shop dog visited baby Jesus too. :)


The pencil tree
Just a 5 footer, but the girls can practically decorate it by themselves!


The banister
I bought a 15 ft garland at Dollar Tree and it fit absolutely perfect from end to end! I added a strand of lights and ribbon. Then I used clear command hooks to hang our stockings. I am going to attempt to make new ones for John and I out of sweaters;  We shall see how that goes. If it goes well, you will know it because you will see a blog post on it. :)


The "mantel"...aka the china cabinet...since we don't have a mantel I get to improvise!


3 wine glasses filled with red and green berries


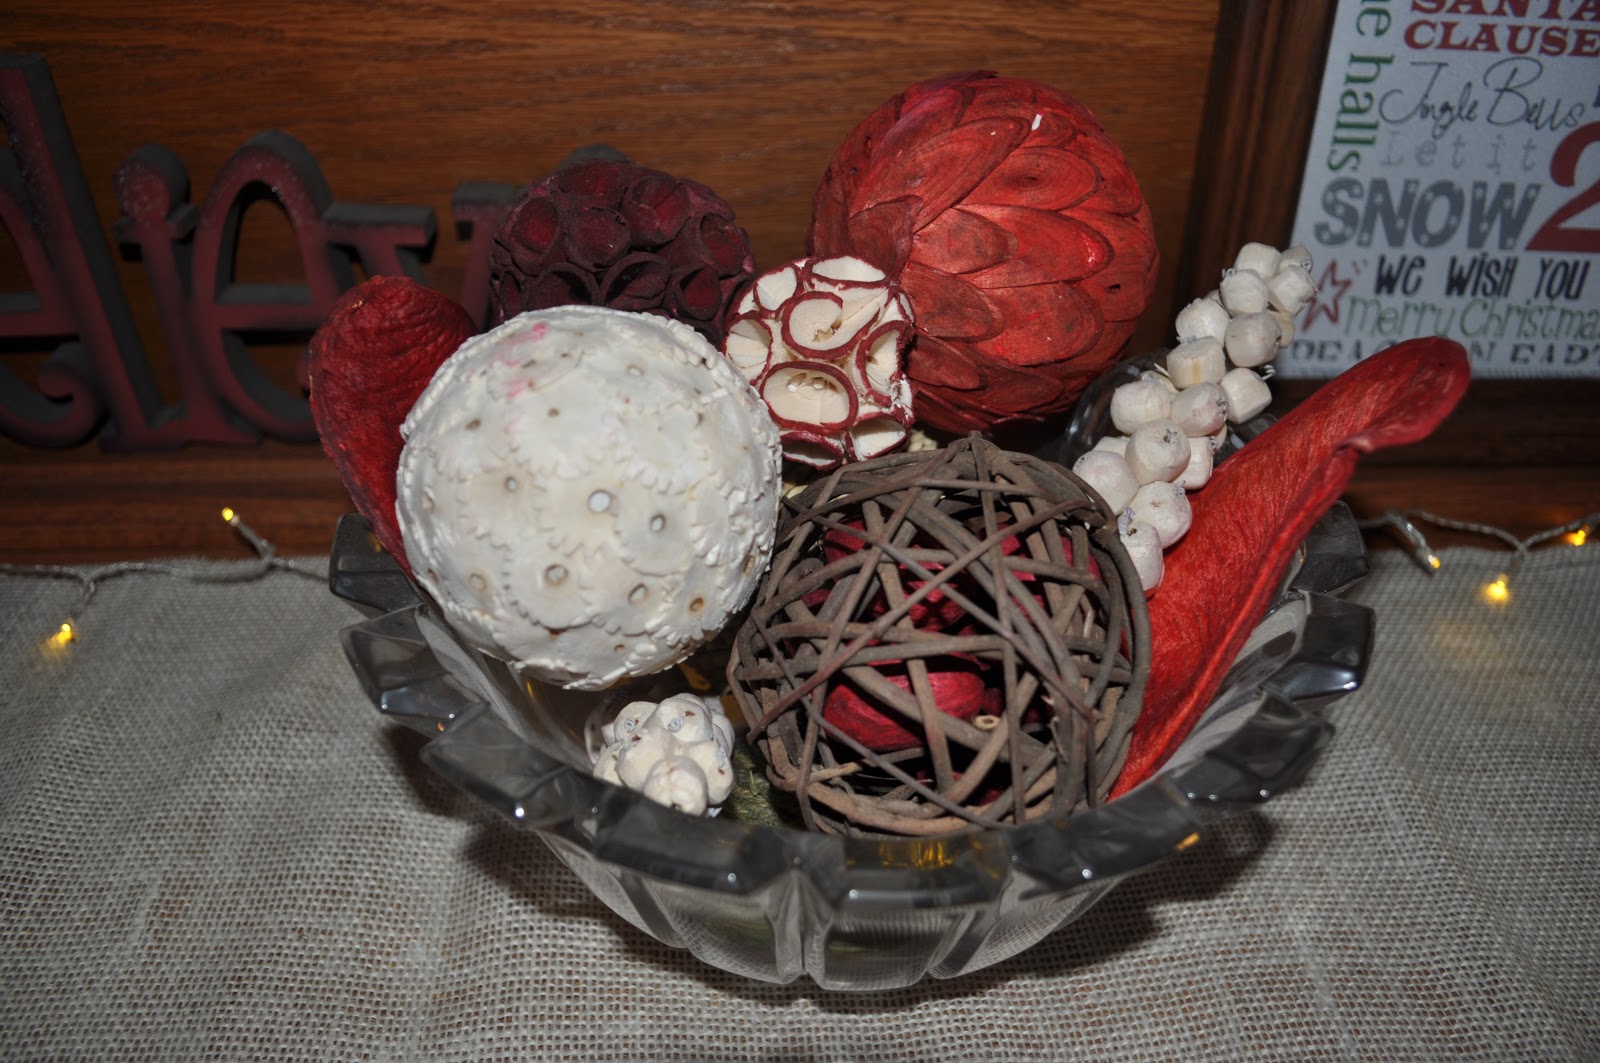
Glass bowl filled with red and white balls
(I believe the technical name for these is "decorative filler balls" in case you were dying to know)


Subway printable found HERE...


Centerpiece
Just some stuff put in a vase, nothing too elaborate.


Front door Wreath
I made this last year using red and white yarn. I also added 2 clear snowflakes on each side. They were table decorations from a friend's December wedding.


Christmas Card Display
I love to see how other people display their cards. I have this hanger from the Christian bookstore that has 3 pockets, but I don't like how I can only show the tops of the cards once they're down in the pockets. So I am trying to think of something new. Maybe some kind of frame with mini clothespins?


I also have plenty of snowmen around the house that get to stay out til Feb or March. That way, the house doesn't seem so bare when all the Christmas decor comes down. I'll spare you all the pictures of those since I'm sure you get the idea.


I also have a few things I want to make so we'll see how many crafts I get to in the next few weeks.

Tis the Season!