Helping you to satisfy your taste for crafts on a budget.
"Whatever your hand finds to do, do it with all your might," Ecclesiastes 9:10
Powered by Blogger.

Monday, May 28, 2012

Memorial Weekend

Now that it is officially summer vacation, so far we have slept in, broken in the pool, had a couple lazy days and started talking about what this summer holds for us.

This weekend we started off with a little baseball. Both my daughter and my husband had games on Thursday night.

Friday...A little family fun at the StL zoo. All the usual attractions... stingray exhibit, children's zoo, train ride, and of course, the carousel (their favorite!) We are very excited for the opening of the new area coming soon, the sea lion arena!


[caption id="attachment_835" align="aligncenter" width="300"] Stingray exhibit[/caption]

[caption id="attachment_836" align="aligncenter" width="300"] Carousel ride[/caption]

[caption id="attachment_837" align="aligncenter" width="199"] My little animals[/caption]

This is how we do lunch at the zoo: we pack our own, park near the shade and have ourselves a little picnic!


[caption id="attachment_838" align="aligncenter" width="300"] Lunchtime![/caption]

Very excited for the new exhibit coming this summer:


Saturday...a haircut for me...woohoo! It had been 3 months since my last one...yes my hair grows painfully slow. Just a quick trim...I'm a simple gal. Oh, and a graduation party for a friend later that evening.

[caption id="attachment_840" align="aligncenter" width="300"] My 'do![/caption]

Sunday...A longer family trip to a graduation party for our cousin. Every time we travel to this area of the state, we pass by the "world's largest cross". It is outside Effingham, Il and stands 198 feet tall. It is at the crossroads of I70 and I57 and can be seen for miles. It is a beautiful reminder that our faith can stand so tall. Here is my pic as we drove by:

[caption id="attachment_841" align="aligncenter" width="161"] World's largest cross...Effingham, IL[/caption]

Here are the girls in the car on our trip...we splurged on these headrest DVD players one year ago and they have been wonderful! Keeps them entertained pretty well. We still have interruptions, emergency pit stops, arguing and all that fun stuff goin on, but these at least allow us to go a few hours without pulling our hair out!


Also on Sunday was my father-in-law's birthday. Happy Birthday Mike! We love you!!


Monday...sometimes we go to the parade in town, but after a long day on Sunday, this time we stayed home and enjoyed a little pool time, grill time, kickin back family time! But we have not forgotten our veterans who fought and for the service men and women who fight today for our freedom! Thank you to all of you who have served and are serving our country; including the families who sacrifice their loved ones!

Happy Memorial Day!


On another note, we are now on baby watch! Our little niece or nephew will be born any day!!!


We are very excited to meet her/him!


C'mon baby, everyone is ready for you!

Monday, May 21, 2012

Paper bag mini scrapbook

The end of a great school year calls for a great end of year teacher gift. I couldn't choose between 2 of my favorite ideas, so I made them both.


Last year I made a paper bag mini scrapbook, and the teacher and whole class loved it. So I made another one this year.

Last years scrapbook:


I asked the parents to send me pictures that they had taken of all sorts of school events such as classroom parties, Christmas program, field trips, class presentations, spring play, birthdays, etc. Then I have them printed and I arrange them into the scrapbook.

I learned how to make these at a mom's group last year (thanks Cristalle!) but found a video tutorial here. If you want to keep it simple, all you need is paper bags, scrapbook paper, ribbon/twine, and adhesive (I ran out of scrapbook adhesive so I resorted to a  glue stick!) Or, if you are a serious scrapper, you can go all out with your embellishments. I am somewhat of a scrapper but just keep a very basic supply stash, so my album is fairly simple.

4 paper bags will give you 14 pages, plus a front and back cover. I used 4 bags and 4 sheets of scrapbook paper.

Steps:

1. Lay your paper bags in alternating directions with the flaps facing up. Watch the video tutorial here if you need a "visual".

2. Use a hole puncher to make 2 holes along the center line to put your ribbon through. This helps to hold your "album" together.


3. Tie lots of fun ribbon strands onto the main ribbon for added flair. I had a ribbon with apples on it and the rest were just school colors.

4. Cut your scrapbook paper into 6" x 6" squares.

*Tip: if you buy the 6" x 12" bags, and fold them in half, it creates 6" x 6" pages, which makes it really easy for you to cut your paper. Scrapbook paper comes in 12 x 12. If you cut it in half lengthwise and widthwise, you get 4 pieces of paper that are 6 x 6 each. Cool!

[caption id="attachment_803" align="aligncenter" width="300"] 12" x 12" sheet of scrapbook paper[/caption]

[caption id="attachment_804" align="aligncenter" width="300"] 6" x 6" sqares of scrapbook paper[/caption]

5. Apply your scrapbook paper to the bag "pages" and then apply your photos.


6. Embellish, Embellish, Embellish!!!


[caption id="attachment_807" align="aligncenter" width="300"] School-themed, teacher-themed, field trip-themed stickers[/caption]

My favorite part about these albums is that by layering the bags in alternating directions, The openings of the bags create these cute little pockets that can hold additional photos or notes or keepsakes.


I also believe teachers could always use a refreshing drink so I picked up an insulated cup and some crystal light single packets to create this gift found here. There is even a printable download for the straw flag which says "Thank you for quenching my thirst for knowledge."  There is even a version for a teacher's aide! You can see my finished product in the top picture above.


Welcome summer!

Thursday, May 17, 2012

Little league snack night

There are many fun treats you can make with Rice Krispies. When I was little, my mom always made M&M Rice Krispie treats for me to take to school on my birthday. She added M&Ms into the mixture...it was my favorite!

I saw this idea on pinterest and decided to make these baseball rice Krispie treats for my daughter's little league team this week.

You just make the rice krispie mixture as usual. Then instead of spreading in a cake pan, you use wax paper to help push the mixture into muffin pans. That way, you get equal sized "baseballs". Then you spread melted white almond bark on top and pipe the red lines on. I had planned on simply adding some red food coloring to the last of the melted almond bark to use for the red lines. Well, friends, that doesn't work cause it immediately clumped...so off to Walmart I ran. And so glad I did because I found Cakemate Glitter Gels!

Ingredients used:


Rice krispies (9 cups)


Marshmallows (1 1/2 bags)


Butter


Almond bark


Red decorating gel


I used cellophane bags to individually wrap them. This recipe made 28 treats which was plenty extra for all the younger siblings that like to be included at snack time. They deserve it too after sitting through a 90 min game. Ok, they don't sit, there's a playground, snack bar, lots of other kids, etc, but still...


I wish I would've had the camera ready at the moment after the game when there was a mad rush of 18 little girls all scrambling for a treat bag and a Gatorade! Priceless!


GO TEAM!!

Sunday, May 13, 2012

Chalkboard Flower Pots

Happy Mother's Day!!


For Mother's Day we usually get my mom and my mother-in-law flowers of some sort, whether its a hanging basket or flower pots. I have been having fun with chalkboard paint lately and decided to decorate my own pots and plant them myself for our wonderful moms. I bought 8" terra cotta pots and flowers and a can of chalkboard spray paint.


1. First I taped off the rim with painter's tape.


2. Primed and Painted (I used 2 coats of paint). I also used the little "coffee filter in the bottom of the pot" trick. Helps prevent the soil from coming out the hole in the bottom.


3. Planted the flowers.


4. Decorated with chalk...the FUN part! It was fun because I got the kids involved. There wasn't much room left after I wrote out " Happy Mother's Day", but they managed to squeeze in a little artwork of their own. Wouldn't it be cute for them to leave cute little messages on them when they visit their grandma's? Or for grandmas to leave cute little messages for them when they come to visit?


The kids helped with everything except the spray painting.


*Note: Be sure to leave the watering step to an adult.


After I took my pretty pictures, I let the kids do the watering and the chalk ran all down the sides of the pots. Not so pretty, but the grandmas still loved them.


Easy as Pie!


My 2 sweet girls...who made me a mother...brought home some surprises for me! Aren't those the best? Gift cards are great, a few hours alone to myself is better, but seeing my children bouncing through the door proudly giving me their homemade mothers day gifts...the BEST!

Miss L made a card at preschool with her handprint. The card has the well-known Fingerprints poem. It gets me every time! All I have to do is read the first line and I'm already tearing up! I'm such a sap!


Miss E planted a flower for me. It came home in none other than a red solo cup, so I moved it to a small terra cotta pot that I painted with chalkboard paint. She also made me 2 cards!


Hope everyone had a fabulous Mother's Day!

Sunday, May 6, 2012

Repurposed calendar frame


Repurposed Calendar Frame!!!


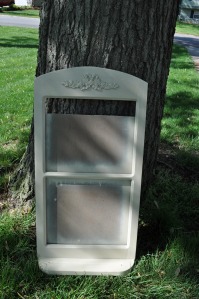
If you happened to see my thrifty burlap curtain project, you might remember that I had leftover fabric that I was going to save for another project. With it, I decided to repurpose an old wooden calendar frame that I've had for years. I found that those holders really only work with one size calendar, and calendars come in so many sizes nowadays that the ones I want always seem to be the wrong size.


First I sanded, primed, and spray painted the frame part.


[caption id="attachment_712" align="aligncenter" width="199"] Supplies: Frame, primer, paint, chalkboard paint, cork, burlap[/caption]

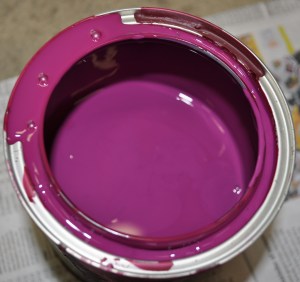
For the bottom half, I kinda wanted to try out magnetic chalkboard paint, but did not read many good reviews on it. So I decided to just use regular chalkboard paint. Did you know that you can ask to have it tinted? And that there are 12 different shades to pick from? The hubs was on his way to Home Depot and I had asked him to pick up a can for me. Having no idea I could pick different colors, he sent me a picture via cell phone of the options on top of the box so I could choose a color. I chose garnet red.


I was a little surprised when I first opened the can of garnet red paint...umm it was very PURPLE!! I double checked the label and it was correct. I don't paint with dark colors very often, so I just kept in mind that paint always dries darker than it first appears, and crossed my fingers that it would turn out ok. I used a total of...several coats...{kinda lost track}. Even though I sanded/primed the wood real good, the paint did not go on as smooth as I hoped. But it still works and I think the texture of the wood just adds a little rustic charm!



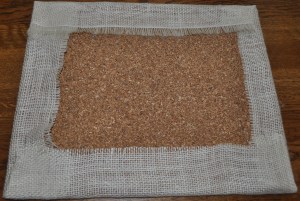
For the top half, I wanted to use my burlap and I also wanted something that I could pin reminders and pictures to. So I decided I would cover some cork with the burlap so it would serve its function yet not resemble a typical cork board. I found a 4 pack of cork sheets for $5.94 at Walmart. I only needed 1 sheet but couldn't find just a single sheet, so technically I only used $1.50 worth.


 So I have 3 extra sheets to find uses for...hmm coasters? Teachers gift? We shall see.


Sometimes a DIY project takes a little extra work depending on what materials you may or may not have on hand. The cork came in 12x12 sheets but my frame's window measured 11x13. This was an easy fix...we used an exacto knife to trim 1 inch off the side and glued it to the top to make it 11x13. Then I wrapped my burlap around the cork and secured it in back with hot glue.


I jazzed up the mini clothespins with some ribbon!


There you have it...a calendar holder turned message board! If you're not much of a DIYer, even if you have never repurposed anything before, it's worth it to give it a try. Not only will you get the satisfaction of a DIY project, but you save $$ that you can invest in other projects around your home. Or in my case, more supplies! :) I found something similar on etsy for nearly $60 after shipping! That's my satisfaction, right there!


[caption id="attachment_743" align="alignleft" width="199"] Before[/caption]

[caption id="attachment_744" align="alignleft" width="172"] After[/caption]

Cost Breakdown:


Already on hand: The main frame and the almond spray paint that I used on it, primer, and burlap I had on hand. You could use any fabric you have on hand instead of burlap! Depending on which room you hang it in, you could use any coordinating fabric that goes with your decor in that room.


Tinted Chalkboard paint...$15


Cork...$6 but 3 sheets leftover for future projects


My cost...$21 but with this project, the supplies I did buy will cover the cost of future projects because I have some leftover chalkboard paint and cork. And this baby is 16" x 30"!...NICE size for a message board!


If you love this look of a chalkboard, and have a very small area to cover, and don't feel like dealing with the messiness of paint, you could try chalkboard vinyl. I have not tried it yet, but I probably will soon. You can pick up a roll of it at craft stores for around $8 (or less if you have a coupon!). I love the look of the chalkboard frig on "Good Luck Charlie" but not sure if I want it in my own kitchen, but this is what you'd use for something like that.


So where do you hang your calendar when you don't use a calendar holder? I tear out each month and hang it on the frig. I like it right where I can glance at it several times a day. Here is our May calendar...full of stuff.
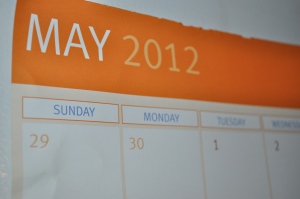


At the beginning of the month, I fill it in with meetings, appointments, trips, school events, church events, birthdays, etc. Not too exciting, and probably not much different than anyone else's. But it allows my husband and kids to see what we have plans for and keeps me from missing things, or more importantly, overcommitting myself. Do you hear me moms?? That's hard to do. Even if we have the same thing every Tues at 6pm, I write it down on every Tuesday for that month. You know how easy it is to think all week "ok, practice on Tues at 6pm, practice on Tues at 6pm", and then all of a sudden you're reaching into the frig at 5:00 to start dinner, and suddenly realize that 6pm is less than an hour away? Am I the only one who has done this? So every reminder is a good thing, and having it right there on the frig is easy for everyone to see.


Whichever sort of message center you choose,


whether a calendar, chalkboard, memo board, or all 3!,


make sure to make it work for you and your family!


Linking up at...


Nifty Thrifty Things


Positively Splendid


I Heart Naptime


Fingerprints on the Fridge


The Frugal Girls


Naptime Crafters


Tuesday, May 1, 2012

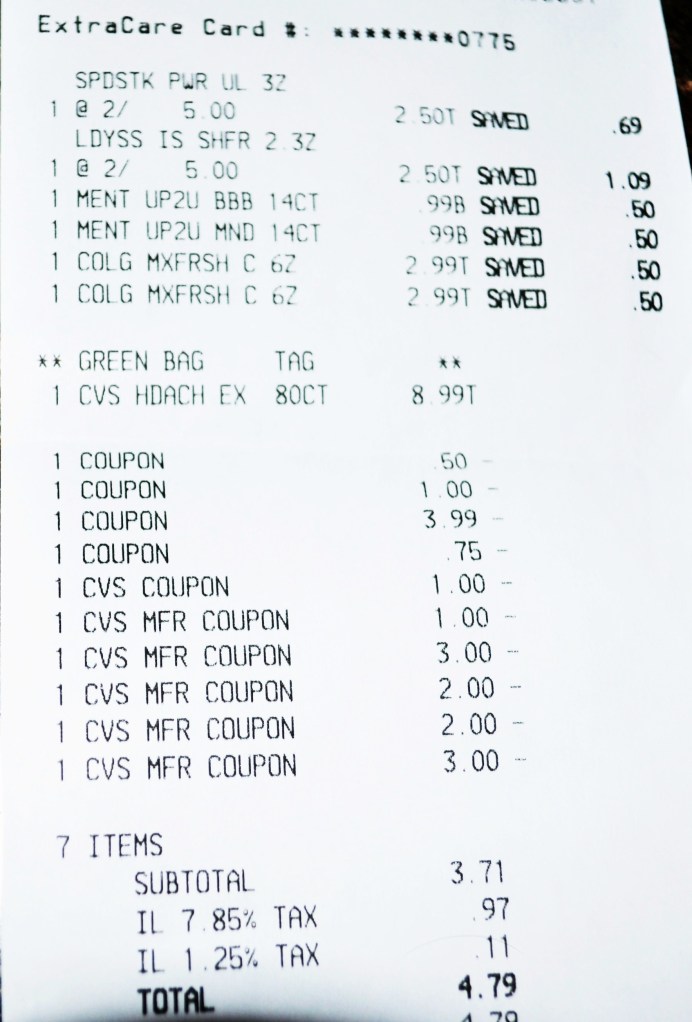
Just an average couponing trip

I have only posted once on the topic of Couponing {click here to read it}, even though it is something that I keep up with every week. The other night as I sat clipping my weekly coupons, my husband said "Ya know, you haven't taken any pictures or posted on any of your great deals lately!"  So I decided I would share the details of a couponing trip I made this week.

So I am going to show you everything I bought at CVS, and what I paid for it.  Occasionally there are items that I have to buy that aren't on sale, but I still manage to get a good overall savings on my transaction.  My example this week: headache meds. I ran out and these are a necessity to me (and most moms). I have kids...LOUD kids...kids that don't always treat each other kindly...hence the need for headache relief. {ok, now I feel bad for blaming it on the kids, sorry kiddos, love you!}

To start with, I had $10 in Extracare Bucks (ECBs) from last week. This is store credit for anything in the store. $10 in ECBs is a lot for me; sometimes I don't have any leftover - it just depends on the week. Also, this time when I scanned my Extracare card at the magic coupon machine, I happened to get 2 coupons for things that were actually on my list! The only thing better than that is when it prints a 20% off your total coupon...love those! So when I walked into the store, I started off with a total of $12 in coupons that I didn't even have to clip from the Sunday paper!

[caption id="attachment_690" align="aligncenter" width="332"] CVS Receipt: Spent $4.79...Saved $22.02...Made $4.98 in ECBs for next week's trip.[/caption]

For the rest of the transaction, I will breakdown the details:

The deodorant was 2 for $5. I had a B1G1 free (buy 1 get 1 free) coupon PLUS a $1 coupon and a .75 cent coupon. Which totaled .75 cents for the pair!

The gum was .99 cents each. I used a $1 off 2 coupon. So I bought 2 packs for .98 cents total.

The toothpaste was $2.99 each. I used a .50 cent coupon and a $1 coupon. So I bought 2 for $4.50 PLUS there was an advertised Extracare reward on this item, which gave me $4.98 back in Extracare Bucks!

Then there was the CVS brand headache relief for $8.99. Thanks to my leftover ECB's, this was covered by those coupons.

[caption id="attachment_700" align="aligncenter" width="300"] CVS Goodies[/caption]

So I paid $4.79 for everything in the picture, saving $22, and receiving another $4.98 in ECB's for my next visit. So by using sales, coupons, and store rewards, I scored these necessities for free. And this is what I do every week to keep stocked up on the things we use everyday. If you start doing this on a regular basis (doesn't have to be every week), so that 1 trip you buy toothpaste and deodorant, next trip you buy hair products, next trip is body wash and lotion, etc...you get the idea...over the course of time you manage to almost always have necessities on hand. The idea is to buy things that you use when they are at their lowest price, instead of when you need them, which is inevitably at full price, which no one wants to pay. And yes, occasionally we run out, or need extra for trips/vacation, or just want to try something new, but I have a little system going and even a small stockpile.

Now if you're picturing spending hours clipping coupons from the Sunday paper, lugging a gigantic coupon binder into every store, or standing in the checkout lane forever with mounds of items and coupons, do not fear!  All you need is about 1 hour to scan through the weekly deals, clip the coupons you need, or print from online (coupons.com is a great source!). Also, when I go shopping, I only bring an envelope with the coupons that I plan to use for that trip. The rest stay home in my binder until they are clipped for next week's trip.

So if you're already an avid couponer, keep up the good work...and I sure hope I didn't bore you to tears!


If not, start small, every little bit helps, and best of luck to you! And feel free to send me a message if you have any questions! Good luck!